
How to send Leads from Webflow to Attio correctly
Learn to send Webflow leads to Attio using Zapier. We’ll cover the right setup order, smart domain pulls, phone fixes, and auto-follow-ups.
Ever had a hot website lead vanish into form purgatory?
Automation tools like Zapier fix that fast.
This Webflow-Zapier-Attio integration guide shares the no-BS way to send Webflow leads to Attio using Zapier, sticking to the key order: company first, then person, deal, and tasks.
Follow along, and you’ll have leads auto-creating records and jumping into follow-ups – no more manual drudgery.
New to these tools?
Note: All of the following are affiliate/referral links.
- Attio: Get 10% off for 1 year (Attio alternatives – top choice: Pipedrive – 30-day free extended trial)
- Webflow: For the landing page (Webflow alternatives – top choice: Framer)
- Zapier: For tying things up nicely (Zapier alternatives – top choice: Relay)
Why Bother Integrating Webflow and Attio using Zapier the right way?
The big screw-up is wrong order – leads end up unlinked or doubled.
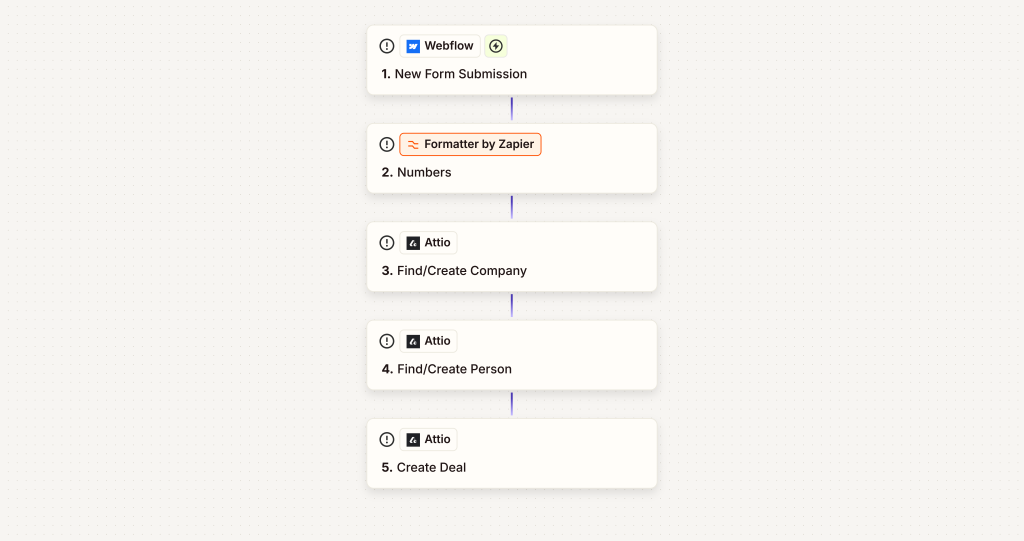
Nail the Attio-Zapier integration hierarchy, and your data stays clean, conversions climb, and you save hours.
How to set up a workflow to send Webflow leads to Attio using Zapier
Step 1: Fire Up the Trigger
Kick off with Zapier’s “New form submission” from your Webflow contact form. It grabs name, email, company, phone. Test with a dummy sub to make sure it hits Zapier clean. Boom – your Attio integration is rolling.
Step 2: Smart Domain Grab
Add Zapier’s AI (using a model like Google Flashlight) to yank the domain from company name or email. Prompt: “Pull the domain from this company name or person’s email – use email if it’s branded, else guess from the company name.”
Don’t forget to ask Zapier to enhance the prompt.
Spit it out as a URL field called “domain.” This keeps your Attio lead forms from websites unique and matchable.
Or, simply ask for domain as part of the contact form?
Step 3: Fix Phone Mess
- Forms spit out wonky numbers.
- Zap a “Formatter” step (Numbers > Format Phone) on the raw phone.
- Output gets polished for Attio.
Step 4: Build the Company Record
Action: Create/update Organization in Attio.
- Name: Straight from the form’s company field.
- Domains: That AI-pulled domain.
Test it – a fresh company pops in Attio, ready to link everything else.
Step 5: People Next: Clean Up Contacts
Organization’s set? Time for the person – ties ’em right to the company.
Action: Create/update Person, match on email.
- Email and Name.
- Phone: Formatted version.
- Lead Source (custom text field – add a custom field in Attio first): “Employee website lead form.”
Links auto to the company. Done – one tidy contact.
Step 6: Turn Leads into Deals
Every sub gets a fresh opportunity – shows real interest, right?
Whip Up the Opportunity
Action: New Opportunity in Attio.
- Name: Company name.
- Owner: Assign it to somebody or add logic to determine who to assign a lead to.
- Link Person.
- Link Company.
Check Attio: Deal’s live, tied tight.
Step 7: Enroll new leads into an email sequence
Unfortunately, you can’t do this via Zapier or any other automation tool.
So you need to set it up with Attio’s built in automation.
- Trigger: New Person.
- Filter: Lead Source = “Employee website lead form.”
- Action: Enroll in your sequence, using person’s ID.
Leads hit your nurture flow on autopilot.
Quick Fixes for Attio Zapier Hiccups
- Order wrong? Company before person, always.
- List gone? Build it upfront.
- Data funky? Format phones/domains in Zapier.
- Need to filter leads? Add as custom field in Attio Person object.
Run full tests. Zap history flags the gremlins.
Wrap-Up: Leads That Actually Convert
This Attio-Zapier integration turns form chaos into pipeline gold. Ditch the busywork, grab those wins. Set it up today – your future self (and quota) will thank you.
Need help with Attio? Get in touch with me.
Need help with Zapier? Get in touch with me.